Jump to content


Photo

Photo Advice - Amfleets at Night


5 replies to this topic

#1 Tracktwentynine

Tracktwentynine

    Conductor

  • Members
  • PipPipPipPipPip
  • 519 posts
  • Gender:Male
  • Location:Greenbelt, MD

Posted 22 April 2011 - 10:41 AM

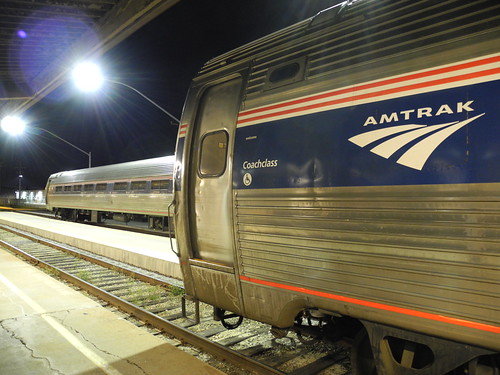
I snapped this photo, "Ready for the Morning", during a smoke stop for #97, the Silver Meteor, at Richmond-Staples Mill Road. It shows the tail ends of 2 Northeast Regional trains parked at the station overnight for their morning departures to the north. I'd appreciate advice on how to improve photos like these, either at the time of the photo or in post-processing. I think the photo came out okay, but I also think it could be better. Thanks!

Posted Image

EXIF Data:
Taken with a Nikon P7000
Exposure: 0.4 seconds
Aperture: f/2.8
Focal Length: 6mm
ISO: 400
No flash
No tripod
Amtrak: 21,626 miles, 18 routes, 39 states, 1 province. First trip 5/2005. Miles in 2012: 4,951.

"My heart is warm with friends I make, And better friends I'll not be knowing; Yet there isn't a train I wouldn't take, No matter where it's going."
--Edna St. Vincent Millay, "Travel"

Follow me: Twitter | Flickr | Tumblr | Blogspot | Greater Greater Washington

#2 Devil's Advocate

Devil's Advocate

    Engineer

  • Members
  • PipPipPipPipPipPip
  • 4,558 posts
  • Gender:Male
  • Location:San Antonio, Texas, USA

Posted 22 April 2011 - 11:03 AM

Hmm. Can you comment a little on your motive or intention? It's a rather jarring photo to my eyes. The contrast is rather high and the bright artificial light is a little harsh while the lens flare is a little distracting. If you want the artificial lights to be the focal point then I would suggest modifying the angle to kill the flare and use a diffraction filter to give the lights some much needed symmetry. I would also try to create some more distance between the lights and the platform roof or simply remove the roof altogether. You might also want to darken the image a little and convert to B&W as the transitions between the night and the light and between the grimey car and the day-glow orange stripes are a little jarring. As-is my eyes have a hard time finding whatever they're supposed to be attracted to. The door? The decals? The lights? My eyes just dart all around looking for a place to rest.

Any views expressed are my own and do not represent the views of my employer, parent companies, partners, or subsidiaries.

Over 50,000 people just like you recently signed a petition to expand high speed passenger rail in the United States of America.

Long live The Coast Starlight, The California Zephyr, The Empire Builder, The Southwest Chief, and The Canadian.


#3 Ryan

Ryan

    Engineer

  • Members
  • PipPipPipPipPipPip
  • 6,858 posts
  • Gender:Male
  • Location:OTN

Posted 22 April 2011 - 11:52 AM

I like it. The eye kind of bounces around, but there's really no way I can think of to compose it differently given the positioning of the two cars. Could you have eliminated the overhead lights by taking a step or two back and then zooming in a little bit closer?

Technically, the only downside is that the strip of platform in the left-center is a little blown out. Would have been a good candidate for some MILD HDR (not that crazy cartoon HDR that you're so fond of).
Posted Image

#4 OlympianHiawatha

OlympianHiawatha

    Engineer

  • Members
  • PipPipPipPipPipPip
  • 1,965 posts
  • Location:Norman, OK

Posted 22 April 2011 - 01:52 PM

Good pic! I like the contrast of the close up Coach against the distant one. You can always Photoshop the lights to tone them down a bit. Since I rarely lug a tripod with me on trips, I have learned to use "makeshift" tripods such as ledges or posts for nightshots, putting the camera into "auto mode" or "automode-night" and using the timer so I don't jar the camera. Just setting the camera on the platform next to the train can give a dramatic perspective.

Being able to review on the fly is great.

#5 GG-1

GG-1

    Engineer

  • Forum Manager
  • PipPipPipPipPipPip
  • 5,544 posts
  • Gender:Male
  • Location:Las Vegas, NV
  • Interests:PRR GG1 and riding the rails to "see the USA in your Chev".....Train

Posted 23 April 2011 - 10:51 AM

Aloha

Saw your shot just before I took the Desert Wind to LA. :rolleyes: This is exactly the type of picture situation that I use the Conkin gradient filters. The light values on the left are so much higher than the right that causes an inbalance, one side over exposed, one side under exposed. Film had about a 2 stop limit. Digital more but there still is a limit. Soon I hope to set a pinned thread on sources and will put a link to the Conkin filters. (when I have a better signal).

Eric aka GG-1, Aloha, Mahalo = Thanks

Picture Galleries Posted Image

#6 WhoozOn1st

WhoozOn1st

    Engineer

  • Members
  • PipPipPipPipPipPip
  • 4,141 posts
  • Gender:Male
  • Location:Southern California

Posted 24 April 2011 - 02:29 AM

Cokin (not Conkin) filters are designed and made primarily for screw mounting on SLR cameras, which the Nikon P7000 is not. For non-SLRs the company appears happy to peddle expensive holders and adapters so their filters can be fitted.

Cokin filter holding gizmos
WhoozOn1st
See! Whooz Train Video Asylum "It's Raileriffic!!" Now over 300 Steam, Electric, and Diesel clips!
Enjoy! Whooz Rail SmugShots & Videos New & Improved: New Pics & Vids added daily!
Peruse! Whooz Picasa Memory Lane is a nice drive.


Reply to this topic


0 user(s) are reading this topic

0 members, 0 guests, 0 anonymous users